To get development started, lets review our basic Exponential Moving Average Crossover strategy. We will refer to this strategy using the name “Phobos”, one of the two moons of Mars.
| Strategy | Phobos |
| Symbol | BTC/USDT |
| Interval | 1 Hour [1h], latest close |
| Exchange | Binance Futures |
| Fast EMA | 9 period |
| Slow EMA | 20 period |
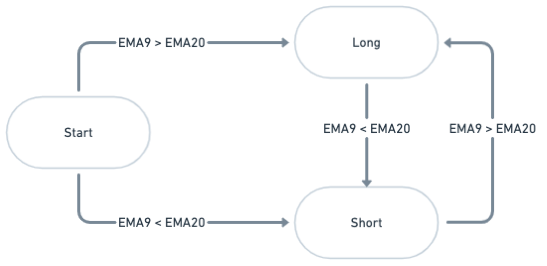
When the latest closed fast EMA (9) crosses up and over the slow EMA (20), we will treat this as a bullish signal and thus go LONG, and vice-versa when the EMA9 crosses down below the EMA20, we will close our long position (if any), and enter a new SHORT position.
We’ll now go through the implementation of each state, starting with the parent State class
// Require the base framework state class
const BotState = require("taapi-strategies/dist/fsm/BotState.js").default;

// Create a new state class
class State extends BotState
{
    // Constructor
    constructor(trade, config, database, order) {

        // Call parent constructor
        super(trade, config, database, order);

        // Get current price
        this.addCalculation("price", trade.interval, `price`);

        // Get latest closed EMA 9 value
        this.addCalculation("ema", trade.interval, "ema_9", { period: 9, backtrack: 1, gaps: false });

        // Get latest closed EMA 20 value
        this.addCalculation("ema", trade.interval, "ema_20", { period: 20, backtrack: 1, gaps: false });
    }

    async tick() {
        throw new Error("Method 'tick()' must be implemented!");
    }
}

module.exports = State;
What happens here is that the first line requires or includes the entire framework, where all tools, functions etc… are located. We then create a new class and extend this to the framework.
The constructor part of the code, is what’s called and run every time a new instance of the class is created. So the first ‘super’ function call is to let the framework know about our trade info, configuration, database and order. Next we’re adding 3 indicators to a bulk call. If your TAAPI.IO plan allows for Multiple Constructs, you can even add other assets / timeframes in the same request.
The tick() function simply tells that the child class must implement this tick() function.
Notice: The “backtrack” parameter, this tells the framework, that we want to get rid of the current unfinished hourly candle, thus leaving us with the latests close.
State “Start”
The framework expects there to always be a State_start.js file exporting a state start class. This is the default state to be loaded, if no other state information could be found.
// Require your strategy's base state class
const State = require("./State.js");

// Create a new class that extends the base state class
class State_start extends State
{
    // Create a constructor that accepts the trade, config, database, and order objects
    constructor(trade, config, database, order) {

        // Call the base state class constructor
        super(trade, config, database, order);
    }

    /**
     * Tick function is called every time the FSM Timer ticks. In our
     * example every 1 second past every 5 minutes, plus the trade delay.
     */
    async tick() {

        // If debug mode is enabled, log the tick
        if(this.config.server.debugMode) {
            console.log(`Tick - ${this.trade.state}:${this.trade.symbol}:${this.trade.interval}`);
        }

        // Fetch all indicators added both in this class and in State.js
        this.executeBulk().then( ta => {

            // If the 9 EMA is greater than the 20 EMA
            if(ta.ema_9.value > ta.ema_20.value) {

                // Enter long position
                this.enterPosition("LONG", ta.price).then( enterPositionResult => {

                    // Verify that whole position is filled and take profit and stoploss orders are placed
                    if(enterPositionResult.success) {
                        this.changeState("long");
                    }
                });

            }

            // If the 9 EMA is less than the 20 EMA
            else if(ta.ema_9.value < ta.ema_20.value) {

                // Enter short position
                this.enterPosition("SHORT", ta.price).then( enterPositionResult => {

                    // Verify that whole position is filled and take profit and stoploss orders are placed
                    if(enterPositionResult.success) {
                        this.changeState("short");
                    }
                });
            }

        });
    }
}

// Export the class
module.exports = State_start;
Say that the hourly latest closed EMA9 is above the hourly latest closed EMA20, this means that we’d like to enter a LONG position for our asset BTC/USDT on Binance Futures.
Note, that we don’t have to close any positions first, as per definition, being in state start, means that we’ve never entered any position for this asset.
State “Long”
Assuming that we changed state above, this means that 5 minutes later, the code for our “long” state will execute.
// Require your strategy's base state class
const State = require("./State.js");

// Create a new class that extends the base state class
class State_long extends State
{
    // Create a constructor that accepts the trade, config, database, and order objects
    constructor(trade, config, database, order) {

        // Call the base state class constructor
        super(trade, config, database, order);
    }

    /**
     * Tick function is called every time the FSM Timer ticks. In our
     * example every 1 second past every 5 minutes, plus the trade delay.
     */
    async tick() {

        // If debug mode is enabled, log the tick
        if(this.config.server.debugMode) {
            console.log(`Tick - ${this.trade.state}:${this.trade.symbol}:${this.trade.interval}`);
        }

        // Fetch all indicators added both in this class and in State.js
        await this.executeBulk().then( ta => {

            // If the 9 EMA is greater than the 20 EMA
            if(ta.ema_9.value < ta.ema_20.value) {

                // Exit position
                this.exitPosition().then( exitPositionResult => {

                    // Verify that whole position is closed
                    if(exitPositionResult.success) {

                        // Enter new opposite position
                        this.enterPosition("SHORT", ta.price).then( enterPositionResult => {

                            // Verify that whole position is filled and take profit and stoploss orders are placed
                            if(enterPositionResult.success) {
                                this.changeState("short");
                            }
                        });
                    }
                });
            }

        });
    }
}

// Export the class
module.exports = State_long;
This does more or less the same as the “start” state, except it only checks if the EMA9 is below the EMA20, and if so, we’ll have to first close our “long” position and take a new “short” position.
If the EMA9 is still above the EMA20, it simply stays in this state and does nothing.
State “Short”
Finishing up with the last state in our EMA Crossover strategy example, the “short” state.
// Require your strategy's base state class
const State = require("./State.js");

// Create a new class that extends the base state class
class State_short extends State
{
    // Create a constructor that accepts the trade, config, database, and order objects
    constructor(trade, config, database, order) {

        // Call the base state class constructor
        super(trade, config, database, order);
    }

    async tick() {

        // If debug mode is enabled, log the tick
        if(this.config.server.debugMode) {
            console.log(`Tick - ${this.trade.state}:${this.trade.symbol}:${this.trade.interval}`);
        }

        // Fetch all indicators added both in this class and in State.js
        this.executeBulk().then( ta => {

            // If the 9 EMA is greater than the 20 EMA
            if(ta.ema_9.value > ta.ema_20.value) {

                // Exit position
                this.exitPosition().then( exitPositionResult => {

                    // Verify that whole position is closed
                    if(exitPositionResult.success) {

                        // Enter new opposite position
                        this.enterPosition("LONG", ta.price).then( enterPositionResult => {

                            // Verify that whole position is filled and take profit and stoploss orders are placed
                            if(enterPositionResult.success) {
                                this.changeState("long");
                            }
                        });
                    }
                });
            }
        });
    }
}

// Export the class
module.exports = State_short;
As you no doubt have guessed, this state does exactly the opposite of the “long” state!
Conclusion
This wraps it up for this tutorial and example. We’ve created an algo-trading bot that simulates buying and selling actual assets on actual exchanges. In the next chapter, we’ll get into applying actual assets to this bot, either by manually telling the bot to trade something specific, or to scan the markets for setups.