As we’ve now coded our first bot. It’s time to apply some actual assets, or coins to the bot.
A single strategy can handle multiple assets at the same time, but it’s up to your TAAPI.IO Rate Limits, how fast you can analyse coins. As an example, say that you’re on the pro plan. This gives you 30 api requests per 15 seconds, which equals 2 calls per second. But each request can handle 20 indicator calculations. This means that if you’re working with 20 assets, then you can analyse all these in 10 seconds, assuming you only need 20 indicators or less per coin.
Manual assets list
Lets assume that you have your favourite coins, and you only want to trade these. This can easily be accomplished by simply adding these to your bot. Take a look at the taapi-strategies/strategy/src/index.js file:
// Require taapi-strategies
const TaapiStrategies = require('taapi-strategies');

// Create a new instance of taapi-strategies
const app = new TaapiStrategies.default();

// Start the app
app.start({
    "start-bot": true, // Start the bot
    "start-api": true, // Start a REST API to interact with the bot
    "setup-webhook-endpoint": true, // Setup a webhook endpoint to receive signals
});
Notice the "start-api": true option, this boots up a REST API which allows you to interact with your bot, and one of the REST calls is to add assets to your bot. Simply make a POST request to your bot URL, which should be running on your localhost:3002 (unless you changed it).
[POST] http://localhost:3002/create-trade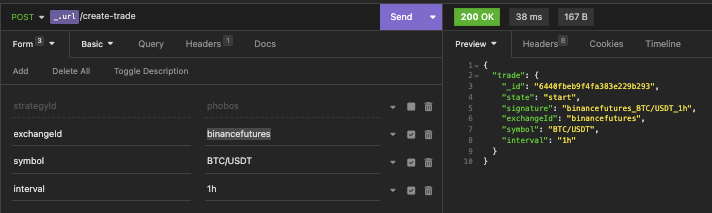
Above we’re simply using one of the many popular REST Clients. This one is Insomnia.
As you can see, the trade has been added to the bot, and upon the next FSM tick, all trades added will be executed in the order they were added, separated by the configured FSM Trade Delay.
Scanning
The above manual list is fine, but if you’d like dive into a little deeper waters, then scanning the markets (or an exchange) is a powerful way of finding interesting assets to trade.
Making up fictive examples as we go, so, say that according to your strategy, we are looking to trade any coin where the RSI has fallen below the 30 line (oversold), and you’re waiting for a reversal signal. Let’s call this reversal signal the MACD Crossover to the upside, and let’s keep it to this for simplicity.
Now let’s say that you’re working with the hourly timeframe, and the Binance Futures USDT market, which at this writing contains roughly 200 symbols. And sticking to our pro plan, a total scan of this market will take: 200 assets on the hourly timeframe / 2 calls per second = 100 seconds which is 1 minute and 40 seconds. This is acceptable, so let’s go with this. Later we’ll get into longer asset lists, and discus our options.
Let’s take a look at our Phobos scanner:
// Create a new Scanner class
class Scanner {

    // Create a constructor that accepts the config, database, utilities, taapiClient, order, and notifications objects
    constructor(config, database, utilities, taapiClient, order, notifications) {
        this.config = config;
        this.database = database;
        this.utilities = utilities;
        this.taapiClient = taapiClient;
        this.order = order;
        this.notifications = notifications;
    }

    // Mandatory scan() function
    async scan() {

        // Post a message to Slack
        this.notifications.postSlackMessage(`Scanning...`);

        // Get all USDT pairs from the exchange through TAAPI
        this.taapiClient.getNpmClient().getExchangeSymbols("crypto", this.config.exchange.id, "USDT").then( async symbols => {

            // Loop through each symbol
            for(let s in symbols) {

                // Get the symbol
                let symbol = symbols[s];

                // Reset bulk queires
                this.taapiClient.resetBulkConstructs();

                // Add RSI calculation
                this.taapiClient.addCalculation("rsi", symbol, "1h", "rsi_1h");

                // Add MACD calculation
                this.taapiClient.addCalculation("macd", symbol, "1h", "macd_1h");

                // Fetch all calculations
                await this.taapiClient.executeBulk().then( async ta => {

                    // If debug mode is enabled, log the scan item
                    if(this.config.server.debugMode) {
                        console.log(`Examining ${s}:${symbol}...`);
                    }

                    // If the RSI is less than 30 and the MACD is greater than the MACD Signal
                    // then create the trade
                    if(ta.rsi_1h.value < 30 && ta.macd_1h.valueMACD > ta.macd_1h.valueMACDSignal) {
                        await this.database.createTrade(this.config.exchange.id, symbol, "1h");

                        // Post a message to Slack
                        this.notifications.postSlackMessage(`Found trade: ${symbol} on ${this.config.exchange.id} on 1h.`);
                    }
                });

                // Wait for the configured delay between each asset (rate-limits by TAAPI)
                await this.utilities.sleep(this.config.bot.scanner.assetDelay);
            };

            // Post a message to Slack
            this.notifications.postSlackMessage(`Scanning complete.`);
        });
    }
}

module.exports = Scanner;
Finally, let’s enable the scanner in the configuration:
bot:
    id: "phobos"
    fsm:
        isEnabled: true
        tradeDelay: 1000 # How big a delay between trades in milliseconds
        tick:
            schedule: "1 */5 * * * *"
    scanner:
        isEnabled: true
        assetDelay: 500 # How big a delay between assets in milliseconds
        tick:
            schedule: "1 1 * * * *"

trading:
    liveEnabled: false
We’re now setting the isEnabled property to true and the assetDelay to 500ms (aka 2 calls per second), and last but not least a cron expression tick.schedule for when the scanner needs to kick in! In this case 1 second past the first minute of every hour. Why this complicated? Well, keep in mind that the FSM will also call TAAPI every 1 second past every 5 minutes, this essentially gives us 4 minutes to complete a scan that only takes 1 minute and 40 seconds, so we can stay within the pro plan, by compromising a one minute scan delay which really doesn’t matter much for this strategy on the hourly timeframe. Or maybe it does, but then please upgrade to a higher plan!
Conclusion
Wrapping up this chapter: In theory, this will set us up for assets that are ready to go long, and when adding them to the list of traded assets, the FSM will kick in and evaluate the states, starting from state start. Now the keen observer will notice that going short from the start state based on the scanner results, might be a bad idea, so this strategy might need some adjustments.